Learn How to Create First Android App
Here we try to describe that How can you make your first Mobile App in Android Studio.This Tutorial can support multiple API Level 18 or above.Hope this will be helpful for Android Beginners.
Prerequisite Knowledge & Android Tools
You should must aware with JAVA Programming and syntax refrence as well as basic concepts of Object Oriented Programing Structure (OOPS).An introduction of XML language and Eclipse is also required.You Should download the latest Android SDK bundle from following link.
Download Android Studio
Before developing Android project you have to install Android Studio and create a Android virtual Device (AVD) where you can test or run your app.For this you must ensure that you have a system images in Androik SDK manager.
To create AVD go to Tools->Android->AVD manager menu and Create a new Virtual Device with "Use Host GPU" enable for faster performance of emulator.
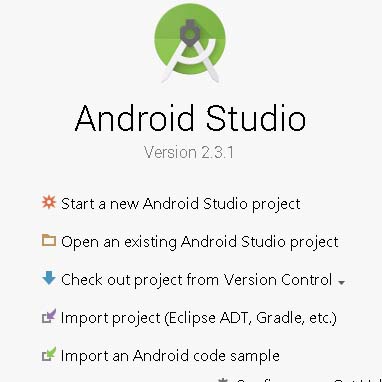
Create a New Android Project
Open Android Studio and in Right Panel select \"Start a new Android Studio Project\"
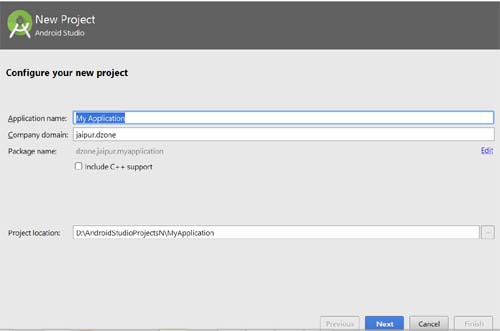
Now you have to specify the Application Name, the Company Domain(website) which used in App package name and the Project Location in the appropriate text fields and then click Next.
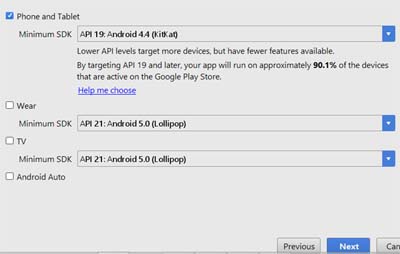
In the next window select minimum target Device API and click Next.
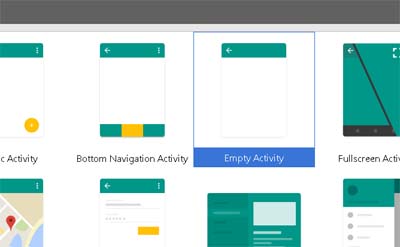
Now Add an Activity to Your App, Select Empty Activity and click Next
Now you have to specify the name of new activity means the name of java class file and XML Layout name. In the Layout Name text field you have to mention the name of the file that will contain the layout description of your app. In our case the file res/layout/main_activity.xml will be created.Class file MainActivity.java will be created in your App java folder within a package folder.
Now your App Screen look like this in Android IDE.
Your Activity Class (Java File) stored in Src->Your package Name->mainActivity.java
Open activity_main.xml from android resources and remove everything.Drag an Relative Layout and then drag a TextView on Layout in Graphical mode of IDE.
	<RelativeLayout xmlns:android="https://schemas.android.com/apk/res/android"
    xmlns:app="https://schemas.android.com/apk/res-auto"
    xmlns:tools="https://schemas.android.com/tools"
    android:layout_width="match_parent"
    android:layout_height="match_parent"
    tools:context="dzone.jaipur.myapp1.MainActivity" >

    <TextView
        android:id="@+id/textView"
        android:layout_width="wrap_content"
        android:layout_height="wrap_content"
        android:layout_alignParentStart="true"
        android:layout_alignParentTop="true"
        android:layout_marginStart="63dp"
        android:layout_marginTop="52dp"
        android:text="Hello World" />
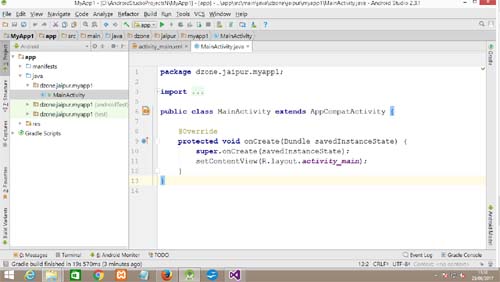
Your java File (Android Activity) should look like this..
public class MainActivity extends AppCompatActivity {

	@Override
	protected void onCreate(Bundle savedInstanceState) {
		super.onCreate(savedInstanceState);
		setContentView(R.layout.activity_main);


	}


}
Now we have sufficient code and design to run an App.But to test the Application we required an emulator or virtual device.So lets create a virtual device.
Go to Tools->Android->AVD Manger
Click on 'Create Virtual Device' ->Now select a device form the list.
In the Next screen device is available to create if system Image available or you have to download it.
That's all Device is created
Now Run the Application by upper toolbar green triangle then select your device and get the desired "Hello World" output.
 Facebook
 Twitter
 LinkedIn
 Delicious